Saturday 19 July 2008

Dry Build

Lack of funds are holding up the engineering work on the crank, bearings, pistons and liners; but that is not stopping progress at the moment.

When you get an engine as a box of bits (all be it a big box! - well actually a 7x5 trailer and back of an estate car sized box), there is always that feeling in the back of your mind.... have I got all of the bits?

In fairness to Lionel, he had stripped it down and meticulously labeled almost everything, even putting nuts and bolts in little bags with labels on them.

When I did the first sort of inventory of bits, the only obvious thing I found missing was a pushrod. I did of course miss the fact that the crankshaft counter weights had gone AWOL http://d3national.blogspot.com/2008/01/new-year.html but this was a minor oversight.

What I had never done, was to open up all of those small packets of nuts and bolts.

Another task (bear with me) is to make all of the joints for the various components.


With these two tasks in mind, I came to a decision. The best way to check on the nut and bolt inventory and assess what joints were needed where would be to carryout a 'dry build'.

The result:


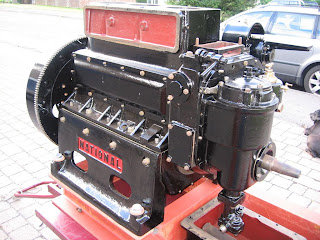
Now, it's not time to get to excited as its all got to come apart again, but it does give an impression of the finished article.

I also now know of a few studs that need to be replaced and a couple of nuts that are missing. Additionally it has helped me find a few places (on the machines surfaces of the castings) that need to be painted before final assembly as they will be virtually impossible to get too once assembled.

A useful exercise and it does raise the level of hope!

Saturday 5 July 2008

Engine Mounting and Bugger!

A while back I posted an entry about the construction of the engine bed and the fun and games had with drilling the engine mounting holes.

Well…. I made a decision about the mounting method and have gone for a modern product call ‘TICO S’. A "High performance machinery mounting pad", according to the manufacturers.

It comes in various guises, but I bought a strip of the stuff 100mm wide (4" in old money) by the standard 12.5mm deep. I also bought some of their TICO S washers.

The engine is to be mounted on the TICO strip and the bolts have TICO washers at the top of the engine. This has effectively cushioned the engine between the TICO material and should absorb a lot of the vibration but still hold it firmly to the engine bed.

The ‘Bugger’ bit?

Well… Whilst carrying out this exercise I noticed an error in the engine bed manufacturing process.

I welded the cross members between the longitudinal members at the engine mounting points. This would give the frame the most strength/rigidity at the mounting points. Fine at the front (this will be effectively covered by the flywheel overhang). A problem at the rear though.

The National has a sump that is separate to the crankcase. The clearance from the bottom of the crankcase to the top of the rear cross member is 4.1/4". What’s the depth of the sump?… 5.1/4" ……. Bugger!


I’ve now got to ‘notch’ out at least 1" from the top of the rear cross member. A bit of an exercise if the engine bed had been built of wood, but its not. It’s built from 6mm structural steel!

It’s been a while since I’ve used a gas axe. Man the fire extinguishers!

Still, at least I’m dealing with these problems in the comfort(?) of the garage. Imagine trying to do it having just lowered the engine in through the roof of your boat on to an engine bed that had just been welded to the bottom plate of your Narrowboat!

Happy days!

Flywheel

'Flywheel'

It's quiet a boring heading I know, but I have finally attacked the flywheel.

Originally the engine had an industrial flywheel (as can be seen on the blog header). This would have been a problem as it did not have any teeth for an electric starter (the engine being hand start only). However, a suitable toothed marine flywheel that matched the crankshaft mounting was supplied with the engine.

So, as per usual, the task in hand was to remove all of the paint back to bare metal.

How much paint can a flywheel have on it! There were layers of the stuff!

There's a lot more surface area to a flywheel than you think. Several tins of paint stripper and many hours with a wire brush and the thing was cleaned up.

One thing it did reveal on the inner boss was the stamping 49909. Could this have been the engine number of the 'donor' engine? If it is; thank you 49909, because your flywheel is now going to be well and truly bolted to the front of 56214. And long may it remain there (mainly because its to blood heavy to get off!).

Of course, once you get all of the old paint off and get the metalwork cleaned up, you've got to put the new stuff on. The result is:

A nice big black shiny flywheel!


Oh........ and another thing. The previous entry was with regard to the water pump. Well, here's a picci of the finished item assembled in full. I think it looks great against the black of the engine (the picci doesn't do it justice and it looks better in the flesh)